Quick Start
1) Create your new project
Create a new folder under Documents/kit55/projectsname it MyProject. That will serve as the home for your new project.
Add a src folder inside your newly created project folder.
2) Add your first page
Create an index.html file inside your src folder MyProject/src/index.html.
Copy the code below and paste it inside the file:
<!DOCTYPE html>
<html lang="en" class="no-js">

  <head>
    <meta charset="UTF-8">
    <meta name="viewport" content="width=device-width, initial-scale=1">
    <title>My Simple Site</title>
  </head>

  <body>
    Hi there!
  </body>

</html>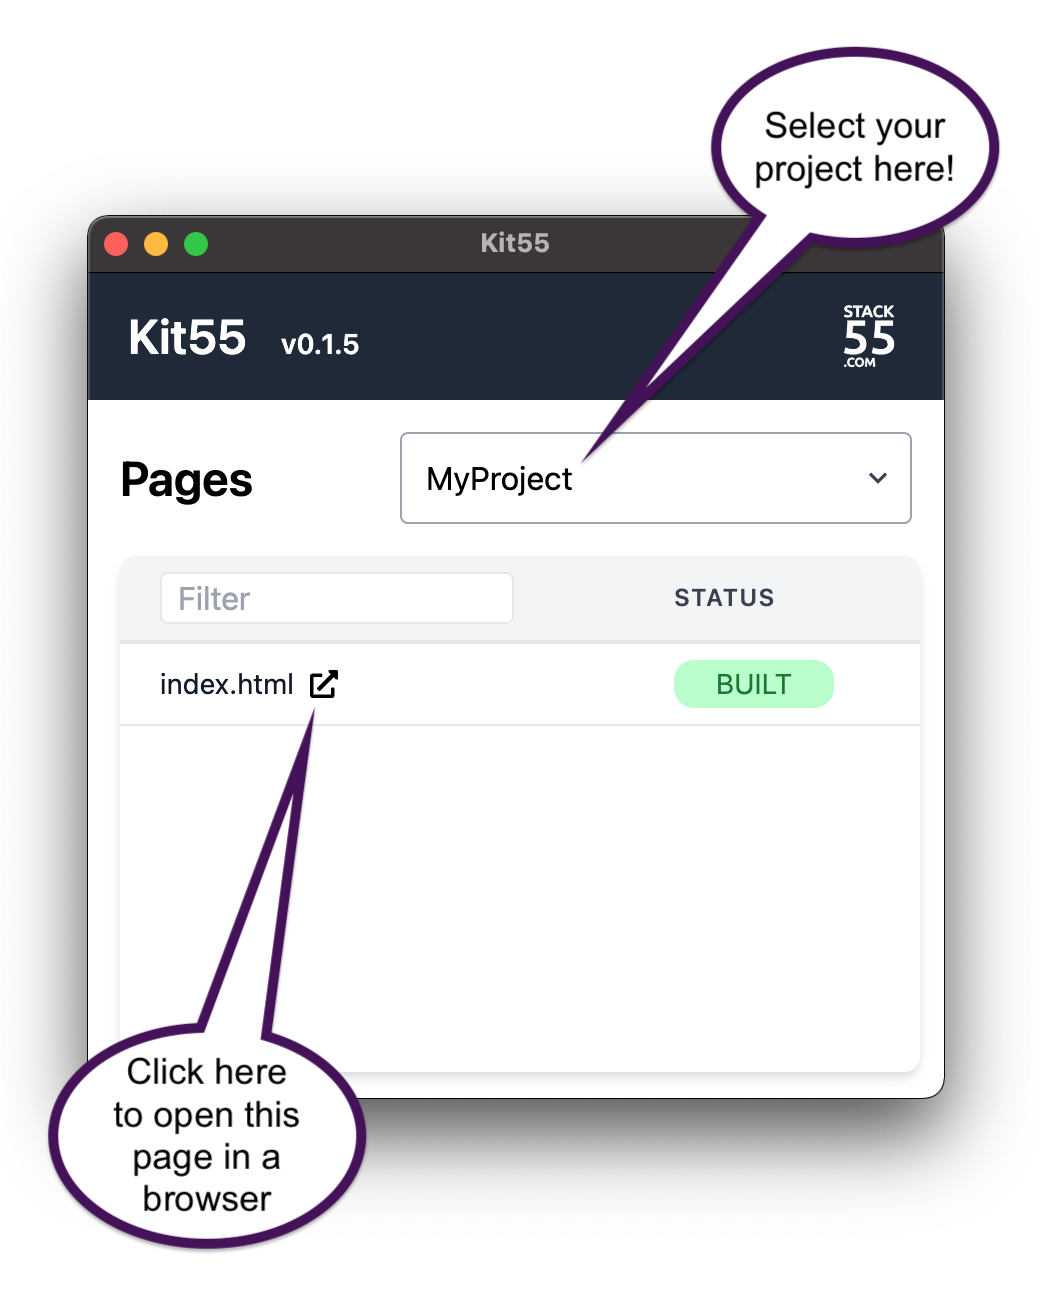
3) Build your project
Open Kit55 - Now your project will be visible in the dropdown box. Select it and you will be able to see your page listed in the pages box right below.
If you click on the small rectangle next to index.html, Kit55 will open your default browser and serve your page. From now on, all changes you make to your page will show up immediately in your browser.
4) Using templates
We haven't done anything extraordinary yet. You can create a simple HTML page in your file system, and your browser will render it as expected as well.
Now, what happens if you want to add shared elements to your pages? That is not possible to achieve by simply writing HTML. If you need a common header, you will have to repeat its code in every single page of your website.
Kit55 allows you to do exactly that.
Create a new file MyProject/src/header.tpl.html
Copy the code below and paste it inside the file:
<header>
  <a>Header</a>
  <nav>
    <ul>
      <li><a>news</a></li>
      <li><a>careers</a></li>
      <li><a>contact</a></li>
    </ul>
  </nav>
</header>
Use the extension .tpl.html to indicate to Kit55 that these shared files are templates, not pages. Templates serve as "building blocks" and Kit55 won't show them in the "Pages" list in the UI.
Next, let's add a CSS file to style the HTML. Create a new file MyProject/src/styles.css and copy the code below and paste it into the file:
body {
  margin: 0;
}

header {
  display: flex;
  align-items: center;
  padding: 30px;
  background: lightblue;
}

header>a {
  font-size: 1.3em;
  font-weight: 900;
  letter-spacing: -1px;
}

nav {
  margin-left: auto;
}

nav ul {
  display: flex;
  list-style: none;
  margin: 0;
  padding: 0;
}

nav ul li a {
  margin-left: 50px;
}
5) Add a reference to your header in your page
Add the line {% include "header.tpl.html"%} to your page, just below the body tag.
Your file MyProject/src/index.html will look like this:
<!DOCTYPE html>
<html lang="en" class="no-js">

  <head>
    <meta charset="UTF-8">
    <meta name="viewport" content="width=device-width, initial-scale=1">
    <title>My Simple Site</title>
    <link rel="stylesheet" href="styles.css">
  </head>

  <body>
    {% include "header.tpl.html"%}
    Hi there!
  </body>

</html>
And that's it! Now you can create new pages, such as MyProject/src/contact.html and include your header in them. Kit55 will automatically include the header.
Any changes you make in the header will be reflected in all the pages that reference it.
When Kit55 builds your pages, it takes your code from src and generates complete pages in dist.
Once you have finished building your pages, you can move the generated pages from dist to your application server.
Using the include statement is the easiest way to reuse elements. However, there are more powerful ways to organize your code, particularly through template inheritance
For more details, read our FAQ.